CLICK HERE FOR BLOGGER TEMPLATES AND MYSPACE LAYOUTS »

Thursday, May 28, 2009

Family Portraits


Nampa Idaho - April 2009 - 3pm - f 3.2 - 1/60 - Canon Powershot S2 IS

This is my mom and my niece Niki. I first added a filter in photoshop to make the picture look like it was painted in water colors. I then placed a border to outline the picture and added the bush on effect. This was possible by going through a series of adding image layers to place a white cover over the picture. I then added a layer mask in black and selected thick, heavy brushes. There were three different types of brushes at three different opacities to add a splotchy and transparent effect.


f 4.5 - 1/50 - Sony DSC - H7

Rexburg Idaho - 5:15pm - June 3, 2009 - f 3.8 - 1/400 -Sony-DSC H7

Cedar City Utah - 11am - f 2.7 - 1/60 - Cannon Powershot S2 IS

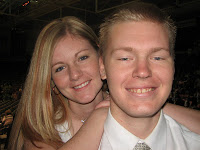
I was able to take the stamp tool in photo shot and go around the blemishes for Nate's skin. I did that a couple times with my skin also. I then took the magnetic tool and outlined the teeth for both of us. Once that was outlined, I opened the saturation tool and turned the saturation down. This makes the teeth whiter and pulling up the brightness bar makes the teeth brighter. The lips and eyes were saturated by using the sponge tool and pulling the opacity down to 30 percent. If the opacity was too high, it would make us both look like we were wearing lipstick. I was able to do the exact same thing with Ana and Tory above. Ana's dress was a light blue and I was able to change it to white through highlighting the dress with the magnetic lasso and then adding a layer (pokemon ball) and going to hue/saturation. There a person can change the color of the dress to whatever is wanted.

Wednesday, May 27, 2009

Night Lights


Rexburg ID - May 29, 2009 - 9:05pm - f 2.7 - 10 - Sony DSC - H50
I was able to twirl a small flashlight in front of the camera for ten seconds. The pink is my hand and the background is a patterned sofa. I like the effect because it makes it look either foggy, ghostly or smokey. The boarding on both these photos was done in photo shop by adding inches to the canvas, shape layers and dropping the opacity to make it less solid. I also blured the inner border by going through the filter and choosing "motion blur."


Rexburg - May 27, 2009 - 9pm -f 8 - 10 -Sony DSC-H50
This picture was done with a match and a fur blanket in the background

Wednesday, May 20, 2009

Bannack Ghost Town


Bannack - May 15, 2009 - 11am - f 2.8 - 1/30 - Sony DSC - H7
I was able to do a brush effect on the church chair pictures. I opened the image in photoshop, added a layer and then picked a background color from the picture. I then "option deleted," picked a paintbrush of any size (normally I pick a natural paintbrush) and just paint the picture back in the image. I chose different opacities and different paint brushes to give it variety.
Add Image
Bannack - May 15, 09 - 4pm - f 2.7 - 1/400 - Sony DSC - H7


Bannock Ghost Town - May 15, 2009 - f 10 - 10 Canon EOS 50D

Each of these photos were really fun to put together. There are two outcomes with the guardian angel pictures. The one to the very right has lake water texture. I used the dodge and burn tool to adjust the colors on the walls. The truck has a cloud texture and HDR changes.


Wednesday, May 13, 2009

Friends


Grazing Beauty - May 2, 2009 - Harmony, Utah - 5:50pm - f 7; 1/55; Digimax A503


Hanging out - May 13, 2009 - Rexburg Idaho -4:30pm - f 5; 1/500; Sony-H50


1) May 13, 2009 - Rexburg Idaho - 4:35pm - f 5; 1/500; Sony DSC-H50
2) f 4.5; 1/400; Sony DSC-H50
3)f 5.6; 1/640; Sony DSC-H50

I was able to do adjustment layers to "Grazing Beauty" and "Hanging out" photos. With adjustment layers, it gives a person the ablility to decided to darken the background and lighten the subject of the picture. With adjustement layers a person can darken and lighten anything wanted in the picture by changing the opacity in photoshop and adding masks and layers and choosing blending modes.


Friday, May 8, 2009


April 30, 2009 - 2:30pm - Rexburg Idaho
1) f 5.6; 1/800; Sony DSC - H50
2) f 6.3; 1/2000
3) f 5.6; 1/1600

Wednesday, May 6, 2009

HDR Enhancement


1. Bannack Ghost Town, Montana - May 15, 2009 - 4pm - f 4 - 1/3200 -Sony DSC - H7
2. f 4 - 1/3200
3. f 4.5 - 1/3200


April 30, 2009 - 2pm -Rexburg Idaho
1) f 6.6; 1/2000; Sony DSC - H50
2) f 8; 1/2500
3) f 8; 1/4000

Each of these three photos were taken on bracket mode with a Sony camera. I placed the camera on a tripod and the camera took three pictures while capturing different shades of light for each. I then took all three photos and loaded them into the Dynamic Photo HDR program. I was able to enhance the sky color and set the picture "pleasing to the eye." There are so many different things that can be done in an HDR program. I was able to do this with the house from Bannack Ghost Town and the pine trees along with this landscape of Rexburg Idaho.